Sunday, May 29, 2011

To Bee or Not To Bee


On May 3rd 2011, my two packages of bees arrived in Denver. A cold front was coming in so we decided to install the bees (into their hives) on the following day. Each package contains approximately 7,000 to 10,000 bees. Since this hobby is new to me, I decided to keep the hives down in Denver this year so that I could learn more and understand what to expect before putting bees up in WY.


TWO SIDE NOTES:


Around the end of April, I purchased 50+ Caragana shrubs (Siberian Pea Shrub) that I will plant in WY as a living snow fence (wind break) and a source of nectar/pollen for the bees. Each shrub will grow to around 12' in diameter and up to 20' high. They are filled with yellow flowers for the bees to forage. I temporarily planted the trees in planters and they are currently in Denver. I'll take some shrubs up to WY each time I go this summer and get them planted. The trick will be keeping the large and small rodents (deer, antelope, rabbits, squirrels and etc) off of them until they get established. It will likely involve a lot of fencing.


In addition to the shrubs, I bought a bunch of native (nectar producing)high altitude wildflowers to plant at the property - Lupine, Penstemmon, Columbine, Indian Paintbrush, etc. I'll be curious to see if they propagate. I do have some of these plants on the property already but not a lot. I might also plant some clover next year.


BACK TO THE BEES -

We made two videos so far. The first one is the installation of the bees into the hive (May 4th). The second one is a check up on the bees to make sure they are producing honeycomb and preparing the frames for eggs and honey. The queen bee lays approximately 1000 eggs a day and the hive will get to around 60,000 bees when the hive is fully established. Enjoy the videos.


May 4th Video - Installing the Bees into the Hive


Installing the Bees - May 4th 2011


May 14th - First Look at Bees within the hive.

Here we are checking to make sure the Queen is alive and laying eggs. We will look for signs of the queen's activity, such as capped honeycomb. The worker bees (all sterile females) will cap a honeycomb cell once the queen has laid an egg. The larvea will hatch in ~ 14 days.


Establishing the Hive - May 14th, First Look in

Sunday, October 10, 2010

END OF SEASON


The first week of October was my last scheduled work weekend for the season. Luckily, some friends helped me throughout the summer and I was (mainly) able to finish on schedule. I debated on whether to stucco/concrete over the walls this season or next spring, but I finally decided to cover the walls in May/June 2011. This will allow the concrete mixture in the bags to further harden with the upcoming rain and snow season. Plus, the landscaping cloth can be exposed to the sun and weather for ten years. This isn't a luxury I'll have with burlap or polypropylene bags.

There are verticle and horizontal supports (rebar) throughout the walls, and in some cases the rebar was angled inward. All of this should provide the needed support in all directions. Next spring, I plan to pour concrete/stucco over the closest row of railroad ties, or figure out how to protect people from any potential creosote leakage. Eventually, I will mortar around some of the placed rocks where noticeable erosion is occurring.

NEXT YEAR - Outdoor Kitchen and Shed

Next year's plans include: Stucco/concrete over the earthen firepit walls and have friends put their finishing touches on the walls by decorating different quadrants with mosaic patterns; Placing the cinder blocks in the kitchen/shed trenches and pouring concrete over them for a foundation perimeter. Additionally, I'll secure the walls more by pounding rebar into the holes of the blocks before pouring the concrete. From there, it's a matter of building the rammed earth and earthbag walls up simultaneously. I might not spend as much time up there this coming summer since I hardly did my fun things. We'll see how the summer goes!


THIS WINTER -

I hope to be building forms for the rammed earth walls (shed); purchasing boat-loads of earth bags/rolls; and working on a website or sign up process that will track those folks interested in learning about earthen building. I'm hoping to set up workshops over a number of weekends throughout the summer. Folks will be able to choose the weekend they want to get their hands dirty and hopefully have a fun experience. For now, send me an email if you'd like to attend one of the weekend workshops. Lastly, I'm going to research whether a bee farm is possible up there. If so, I'll build or buy some boxes and a bee suit :)

Have a great winter and I'll report back after mud season. Namaste


Monday, September 6, 2010

Labor Day Weekend- Sept 4th through 9th- Deviation to an Earthbag concept

This weekend, I had a choice in climbing up one of the 14er's near Aspen, going to Guatamala to summit an active volcano (Fuego), or working on my summer project up in WYoming. Guess where I decided to hang out! Isn't that would you would have done???


It was another great weather weekend up in WY. I got up around 2PM on Saturday and started working on stabilizing the walls with an earthbag process. Instead of buying the polypropylene or burlap bags, a landscaping supplier (http://www.weedbarrier.com/) sold me a woven landscaping cloth. 15' X 360' of it as a matter of fact -figuring this will get me further than buying 1000 earth/sand bags at a time. So far, the process is working out well. I'm mixing approximately (5-5-1) 5 shovels full of dirt, 5 - gravel and 1 - portland cement. Once it's all mixed (dry), you shovel it into the cloth (of varying lengths) and fold it over. From here, you flip the open side over, facing the ground - wet it down, place and shape it, then tamp it down to set it.


I was able to complete almost half of the pit (back wall and foot space) within a day and a half. Monday I was hoping to get further but the weather kept me from working. The windy Wyoming weather lived up to its reputation. WELCOME TO WINDY WYOMING - HOME OF THE TUMBLE WEED, TUMBLE RABBIT, TUMBLE COW, TUMBLE TREE, TUMBLE HOUSE .... - The weather was supposed to reach 60 degrees and it might have been, but the wind chill was bitter and obnoxious. My hands were numb from walking across a small portion of the property at 9AM. I decided to head back to Denver and hang out with some folks visiting - one friend from high school (leaving Tuesday) and my cousin (leaving Thursday or Friday).


I've included a pix of some of the tiles I've collected over the past few years. These will soon have a home within the seating area of the firepit and possibly other places, if people decide to put them elsewhere. There are piles of other items I hope to incorporate within the walls. If you have some things that you'd be willing to donate to the pit, drop them by. I'd love some unique things - like dinosaur bones, fossils, shells, plastic molds to make cool designs, anasazi anything - well you get the idea. And the list goes on!


For fun, I've included a picture of my neighbor's project. I might have mentioned that I have some copycat neighbors. When they saw what I was doing, they dug a pit for themselves the following week. We are now in a competition to see who can finish first. We both started this weekend and we'll see who wins. It might be them since they can work on it every day. They've chosen to go the more traditional (pouring concrete) way. I'm afraid to tell them anything more - what else will they copy? hee hee


Once the stabilization of the walls has been completed, stucco or a concrete layer will cover the earthen walls and will be the base for the final mosaic finish. More to come. Have a great week.


Friday, September 3, 2010


Weekend of August 28th, 2010
There's nothing like starting out a weekend right. My neighbors invited me to a bar in Laramie -Friday night- where we watched a country-funky-bluegrass-ish band. Holland Wofford. These guys are really fun to see live. Thanks Gayle and Dennis.
On Saturday morning, I woke up with ambitions of making huge progress and then realized that I didn't have all the materials that I needed to complete the wall building around the circumference of the firepit (If I would have thought about what I actually had up at the property, it would have been a pretty simple deduction -duh). In reviewing my per-dic-a-ment, I considered some alternatives. My initial plan was to stack bricks or pavers along the wall and fill in the gaps behind with concrete/cement. There's a lot of bricks or pavers needed to fill a firepit with a diameter of 16 feet and walls around 2 1/2 tall!!! After completing a section, I looked at the large gaps that would need to be filled in with concrete and felt that the way I was going about it didn't really make sense. I needed to come up with an "easy" way to make a stable wall that would survive the Wyoming winds and freeze-thaw actions up at 8300'. I was also not sure that making a top heavy concrete wall was the right way to do this, since the tops of the walls have eroded away. It finally dawned on me that I have almost all of the materials that I need to make these walls very stable using earthen building techniques. Following the earthbag concept, I planned to fill either woven poly-propylene bags or burlap bags with a soil-sand-gravel mixture to make solid walls. This methodology would fill in the bigger gaps near the top of the walls, where the walls have eroded in from the weather and usage. It will also allow me to make solid edges at the top of the wall when I finish over it with a concrete-stucco like finish.
Since I didn't have the earthbags to complete this over the weekend, I trenched out more of the kitchen and shed perimeter. I hope to have this perimeter foundation poured in the next few weeks.
This is all I have for now. Until next weekend (which is actually tomorrow!!!) . So much for finishing the weekend out as it started!!! It was a pretty fun weekend overall, considering.
Did I mention that we found a lost border-collie and eventually got her back to her owner. Cricket and I drove through Vedauwoo proper and the campground for a good hour or more trying to find her papa. It turned out she escaped from a ranch down the road.
I was also reunited with a friend that I knew and climbed a little with when I lived in Laramie (something like 13 or 14 years ago~).
Hopefully someone who is reading this silly blog, and considering their own earthen project does not have to struggle and back track quite as much as I have. Luckily, I don't mind this and have been learning a lot about the process and myself. I've worked out the bugs (or at least some of the bugs) for ya~

Monday, August 23, 2010

Weekend of the Perseid Meteor Shower -Aug 13-15


So, the meteor showers weren't quite this spectacular in the sky but it was a spectacular weekend. Approximately 40+ friends came to celebrate the Perseid meteor showers, climb, hike, bike and what not on my property for the weekend. We even had an astronomy buff talk to us about what was occurring in the sky, with a lot of ooohs and ahhhhs each time a meteor shot across the sky. Thanks Glenn for all of that. It was amazing! The weather was perfect and everyone appeared to have a good time. Thanks to everyone that came out. We hope to have a second annual celebration. It was renamed by "Monster" as the Suzapalooza. That would mean that I need to add live music though...wouldn't it? Does anyone own a guitar that would be willing to play next year?


Check out some of the pictures of the people and property.


Friday, the crowds arrive. Saturday, the porta potty finally made it :)


Thanks Lori and friends for capturing the sunset and other pix.


Hmmm. Even a spaceman came to visit us!!!


Raging fire. Thanks Michael for your amazing pictures. What's actually going on down there?


I'll be back in WY the weekend of the 27th again so you'll get to hear more about my progress and a little less about parties on the property. Its good to take time and and do this though!

Saturday, August 7, 2010

Preparing the FirePit for concrete

Last weekend (July 30th), I went up to work on the firepit. I've been talking with a few folks about finishing options and still struggle with what to do. Pouring concrete in there to stabalize the wall seems ideal but I worry about freeze/thaw a little bit. I got this old wood (2X4) from a rancher in Fort Collins that was tearing down a fence. They were open to other neighbors taking the wood so I collected a bunch of the fencing and stored it at a friends until that day that I started building.

Well, I found a great way to use some of it - I dug a trench and stuck the board in. This will give the rounded fire pit a faceted dimension inside once the vertical walls are poured with the concrete. I may leave the outside wood face exposed, for character, but also have plans to cover the vertical walls with mosiac designs. Decisions. Decisions.


This week, the need for some key materials came to a head. I picked up a generator and a cement mixer on craigslist. Great deals. Next season, I may need to get serious about drilling a well for water access. My WY neighbors have graciously offered their outdoor spicket, but accessing their supplies gets old after a while, especially when I'll need more than I can carry for the building project. Also, I don't want to wear out my welcome.


Preparation work for earthbag kitchen walls


I don't know about you but I like a lot of diversity. One can only do so much before your brain gets overloaded and it's time to move on to the next project. In this case, the earthbag kitchen walls were beckoning for my attention. The wall building process involves filling bags (burlap or polypropylene) with gravel, dirt and a little concrete, laid out to make the wall, similar to brick laying. I dug a one foot deep trench where the wall will go. The next steps will include pounding rebar into the ground for additional vertical support, and putting down one layer of bricks to keep the bottom of the wall dryer and more stable. From what I've read, the vertical support is not necessary, but it will make me sleep a little more sound at night. It is windy Wyoming after all. I'm sure there are gusts of wind that could take a 2 to 2.5' wide wall down! Aren't there???

Changes in my summer completion goals
So, I'm finally starting to realize that I have a big project on my hand. It might not be completely realistic to think that I could have the firepit and the outdoor kitchen completed in one season. I thought that was a realistic goal at one time. Not going up to WY this weekend probably didn't help but the weather seemed iffy. So this summer, I still do have three main goals.
Goal # 1
My goal by mid-October is to have the firepit completed (but not necessarily all of the mosaic designs). This means that I would like to have the firepit walls and seating areas filled with concrete or some solid mixture. I hope to recruit some creative friends to help with the mosaic designs on the vertical walls. Having them add their touches to the different sections or facets will be an awesome way to remember them. This one shouldn't be too hard to complete and will be my high priority goal.
Goal # 2
Also, it would be great to have started the kitchen wall, and ideal to have at least that wall completed and sealed up before winter. That process is pretty fast once you get into the rythym but involves a lot of shoveling of the gravel/dirt mixture into the bags. Thanks to the backhoe weekend, there should be enough earthen materials to complete this.
Goal # 3
Lastly, I would like to have trenched out the perimeter of the shed so that I can start ramming the earthen walls earlier next spring. In addition, it would be great to have poured the shed's (perimeter) foundation for those rammed walls so that it's had time to cure and is ready to bear the earthen wall loads the following spring. This is the 2nd highest priority.
As I write this down, I realize that it might make sense to build the earthbag kitchen wall and the rammed earth shed at the same time. If I have friends helping, they can learn two different techniques in a weekend, switching between the two walls to break up some of the monotomy.
Smaller goals over the winter
Last weekend, a hummingbird visted me inside the trailer and I realized that I didn't have anything to feed it. I'd like to work on a few projects that will increase the presense of wildlife on the property and this event just reinforced it.
I've been thinking about building a bee farm on the property so I will research what is involved to make this happen over the winter, including whether it's a viable plan. Also, I'm going to build a bunch of bird houses to attract "mountain bluebirds". There's some building specifications that you need to follow to get this species to nest down in the boxes; it's great to entice the birds that are native to Wyoming.
Long term goal:
My neighbors and I talked about damming up one of the valleys between our properties to attract some of the larger animals (deer, antelope, elk, mountain lions, etc). This sounds like another major project in itself, doesn't it!
There's always some other fun project to work on up there. Looking forward to all of it!

Monday, July 26, 2010

Summer 2010 - Change in Plans Again!

MAKING PROGRESS - OUTDOOR KITCHEN, SHED and a FIRE PIT


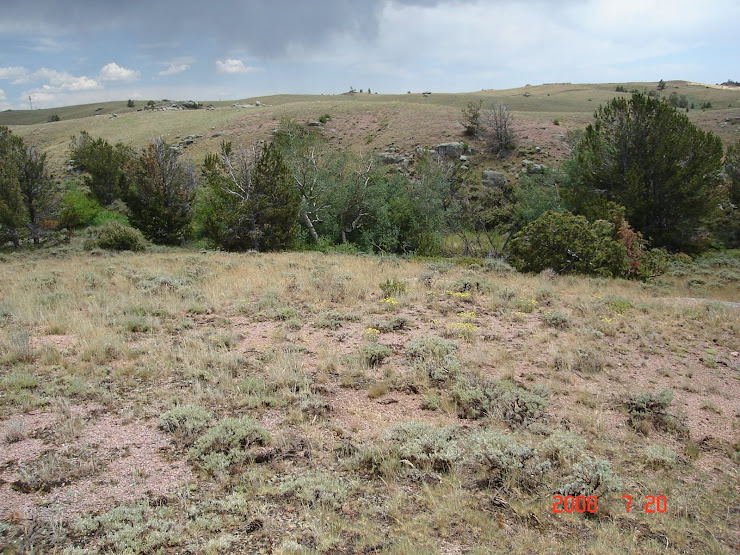
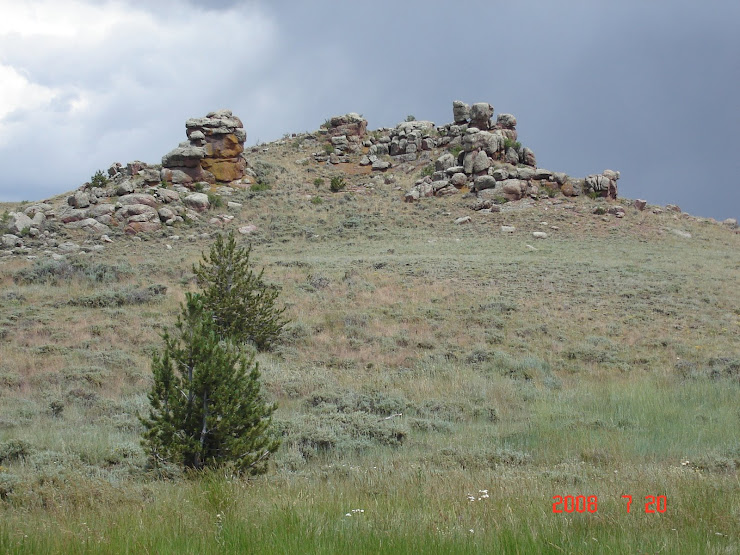
Site for the outdoor kitchen and shed (in front of the rock formation)
FIRST, MAKE FIRES
It's finally feeling real!

This weekend, I rented a backhoe and we worked on my firepit design, leveled out the ground for an outdoor kitchen and shed, and also spent a little time leveling ground for a yoga, tai chi, and meditation area near some cool granite outcrops.

My friends are still talking to me and said it was more fun than work. I hope I wasn't too much of a drill seargent on any of them! :)
Pre Backhoe Digging
Johnny with a scoop of dirt from the firepit
Johnny and the Backhoe, after the front bucket scoop action. Chris and Wayne are supervising
Chris shaping the seats and floor of the firepit

First, we worked on the firepit. Johnny and I had spent a weekend digging out the perimeter and some of the inside area to make it easier when the backhoe arrived. There's one radio station that comes in really well up there... 102.9 ... a classic rock station that played all the music I listened to when I was in high school. It's funny how you can remember the words to all those songs that you haven't heard in 20 years!

Chris, Wayne, Johnny and I took turns on the machine clearing out as much dirt as we could with the front bucket before using the backhoe.

On Saturday night, we were able to christen the firepit. It worked like a charm. The smoke went straight up and outside of the pit. The pit is approximately 15 feet wide (diameter) and 4 feet deep in the center. The back seat is approximately 2 1/2 feet tall with the seat approximately 18 inches wide. We ran into some rocks in the lower section and so the footing is sloped towards the center. I wanted to have a 18 inch vertical drop for the feet but instead made some natural curves to the center. Also, Chris and I worked on a stone stairs leading into the firepit.
Chris, Tilly, Wayne, Jack, Johnny and Suz


Next steps will include building a berm around the low spots of the pit; tamping down the soil; preparing the pit for concrete. I'm planning on using rocks, wood and other materials to make a mosiac pattern within the concrete mixture that will support the walls.


OUTDOOR KITCHEN AND SHED

Once we made a bunch of progress on the firepit, Chris and I moved up to the outdoor kitchen and shed area. We took the machine with us and started scooping and leveling out dirt while Johnny and Wayne were digging out and forming (by hand) the firepit. After a while, we switched roles to give each other breaks from the harder labor. Johnny and Wayne made a nice platform for the outdoor kitchen and shed. Still a bit more work to do on Sunday before its ready to go.
First scrapings for the outdoor kitchen and shed. The shed will be furthest left and will share one wall with the kitchen. The kitchen will have a gravity operated sink with a drainage tub beneath. There will also be room for either a stovetop or a grill in the designated space.
Getting closer
We woke up to another beautiful Sunday morning in Wyoming. Chris and Wayne said they heard a bunch of coyotes or fox in the night. I must have slept through that! Wayne wasn't feeling well and realized that he might have gotten some sun poisoning on his scalp. Make sure you protect yourself while working outdoors!

Johnny and I started working around 10AM. We cleared, scraped and leveled out more of the kitchen/shed area. When we felt good enough with our leveling progress, we headed up to the yoga, tai chi and meditation area and started moving dirt up there. I was amazed at the amount of dirt we had to move to make it somewhat level. This area still needs some work but we made some progress. It will also be a great tent pad for friends coming to the "Party with the Perseids" in August. No pictures of this area yet. You'll just have to wait til the next posting.
Designated kitchen and shed area
Entrance ramp to the kitchen and shed area
Stay tuned regularly for more updates